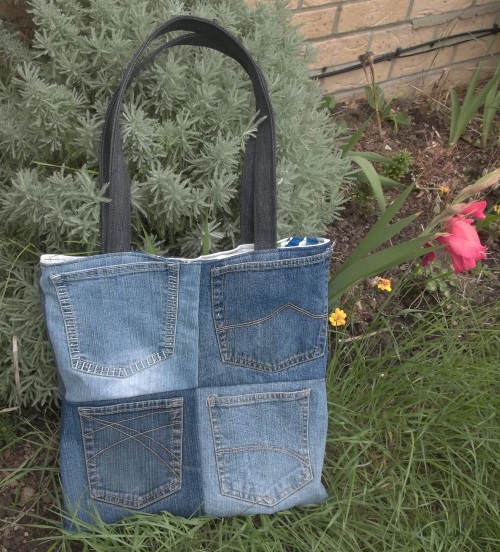
This is made using my recent tutorial, but I have put this post up separately because it shows how you can make good sue of unusually shaped pockets.
This pair of jeans had one button down pocket- always a useful addition. However, it was unsuitable for many of my projects as the lack of space around the pocket meant it could not be cut to a rectangle. It made a great pocket purse, however!
This blog shows my recycled denim creations, along with tutorials for items I have designed myself. I collect old jeans (a strange collection, I know!) and cut them up to make bags, purses, animals and other items of varying sizes and shapes. I then sell these to raise money for weomen and children in the town of Utange, near Mombasa, in Kenya. I help women to set up their own businesses and am supporting the building of a new school for disabled children.
Sunday, 18 October 2015
Saturday, 10 October 2015
Shaped pocket purses - tutorial
As well as the boxy pocket purses, I also make a more straightforward version.
Making these is very simple:
1. Cut round one of the pockets, leaving at least one inch of plain fabric all the way around the pocket. Follow the shape of the pocket.
2. Put this pocket face down on top of the other pocket and, using it as a template, cut round.
3. Fold the lining fabric in two, right sides facing, and, again using one pocket as a template, cut the lining to match.
4. Use your zipper foot to sew one side of the zip to one pocket piece along the top.
5. Put the matching lining piece on top of the pocket, right sides together with the zip sandwiched between the two pieces. Again, sew the zipper to the fabrics.
6. Repeat with the other side of the bag.
7. Top stitch along the zip, keeping as close to the edge of the fabric as possible.
8. Open the zip.
9. Open out the pieces and put them right sides facing so that the linings match and the pockets also match.
10. Sew all the way round the outside edge, just leaving a small section at the base of the lining open for turning.
11. Turn the bag the right way out and sew up the seam you left open on the lining.
12. Push the lining inside the bag. Your pocket purse is finished.
Making these is very simple:
1. Cut round one of the pockets, leaving at least one inch of plain fabric all the way around the pocket. Follow the shape of the pocket.
2. Put this pocket face down on top of the other pocket and, using it as a template, cut round.
3. Fold the lining fabric in two, right sides facing, and, again using one pocket as a template, cut the lining to match.
4. Use your zipper foot to sew one side of the zip to one pocket piece along the top.
5. Put the matching lining piece on top of the pocket, right sides together with the zip sandwiched between the two pieces. Again, sew the zipper to the fabrics.
6. Repeat with the other side of the bag.
7. Top stitch along the zip, keeping as close to the edge of the fabric as possible.
8. Open the zip.
9. Open out the pieces and put them right sides facing so that the linings match and the pockets also match.
10. Sew all the way round the outside edge, just leaving a small section at the base of the lining open for turning.
11. Turn the bag the right way out and sew up the seam you left open on the lining.
12. Push the lining inside the bag. Your pocket purse is finished.
Friday, 2 October 2015
Fancy pocket purses
These pocket purses make maximum use of decorated pockets, and I predict they will be sold before this post appears!
I used a variety of strap lengths on these - hopefully I will succeed in pleasing appropriate customers!
Tutorial here.
I used a variety of strap lengths on these - hopefully I will succeed in pleasing appropriate customers!
Tutorial here.
Thursday, 24 September 2015
Plain pocket purses
Here is another couple of pocket purses; all of these with plain pockets, hopefully appealing to both male and female customers.
You can find the tutorial for these here.
Wednesday, 23 September 2015
Original pocket bag
These are the latest versions of my original pocket bag (which continues to sell well!) You can find the tutorial here.
Wednesday, 16 September 2015
Zippered pocket bag
These are the type of pocket I love to find - it is great to have a pocket which will fasten on a pocket bag. However, on this occasion the pockets were too small for a pocket bag, so I decided to use them to make this purse.
It is another of the boxy pocket bags I have made for a while; you can find the tutorial here.
Tuesday, 15 September 2015
Contact from Kenya
I have had some lovely emails from Florence in Utange recently. She has told me that other parents of her school are asking when they will get solar lamps, and that the families who received them are really grateful to have light in the evenings. She has also just sent me an email which says,
On last Friday afternoon I had some few ladies who are interested to do sewing and we plan to start our meeting this coming Friday and to start making some few things e.g pillows,door mats,table mats,brooms,making soaps,etc. We shall be teaching each other before you come. I will send the names of the ladies and pictures of what we are doing and I think to name the group your name.
This is so exciting to read. To hear that the ladies seem to be beginning to have hope, to be beginning to start up their own businesses, working as a group, is fantastic. If they can begin to make things which they know they can sell within the village - this is just what I hoped for, and just what I would like to invest in, to help them to grow their businesses. To have them call their group "Sewing for Utange" is an added bonus!
On last Friday afternoon I had some few ladies who are interested to do sewing and we plan to start our meeting this coming Friday and to start making some few things e.g pillows,door mats,table mats,brooms,making soaps,etc. We shall be teaching each other before you come. I will send the names of the ladies and pictures of what we are doing and I think to name the group your name.
This is so exciting to read. To hear that the ladies seem to be beginning to have hope, to be beginning to start up their own businesses, working as a group, is fantastic. If they can begin to make things which they know they can sell within the village - this is just what I hoped for, and just what I would like to invest in, to help them to grow their businesses. To have them call their group "Sewing for Utange" is an added bonus!
Saturday, 12 September 2015
Elephants again
I do enjoy selecting the fabrics for the elephants, both for the bodies and for the ears. I stocked up on fat quarters of African fabric a while ago, but I think restocking time may be fast approaching.
Friday, 11 September 2015
Photobook
I have been revamping my "promotiional materials" recently. For a long time I have used Vistaprint, but following some problems with them I am now using three different suppliers.
I don't really have many promotional materials which I use regularly - the three key ones are a banner, business cards, and a wallet of photos. When recreating the first two, I decided to take another look at the photographs. These are really useful - sometimes to amuse children and allow their parents to look at the items I have on my stall, but often to give more detail about what I am doing. So I thought I would order a proper photo book. I decided to go with Bonusprinr, and was really pleased with the result and the service. I ordered one of their small photobooks, and hope to have a new one created each year, tracking how my projects progress. This one is really an introduction, giving background information and explaining what I have done and hope to do.
The photo book arrived really quickly, and is of good quality. I am particularly pleased that the paper is glossy and thick and robust; it looks as if it will withstand handling very well. An added advantage is that there is an online version of the book, so I thought I would share it with you here.
I have attempted to embed the book, and your browser may well allow you to see it below. However, if not, you can access it here, should you wish to!
I don't really have many promotional materials which I use regularly - the three key ones are a banner, business cards, and a wallet of photos. When recreating the first two, I decided to take another look at the photographs. These are really useful - sometimes to amuse children and allow their parents to look at the items I have on my stall, but often to give more detail about what I am doing. So I thought I would order a proper photo book. I decided to go with Bonusprinr, and was really pleased with the result and the service. I ordered one of their small photobooks, and hope to have a new one created each year, tracking how my projects progress. This one is really an introduction, giving background information and explaining what I have done and hope to do.
The photo book arrived really quickly, and is of good quality. I am particularly pleased that the paper is glossy and thick and robust; it looks as if it will withstand handling very well. An added advantage is that there is an online version of the book, so I thought I would share it with you here.
I have attempted to embed the book, and your browser may well allow you to see it below. However, if not, you can access it here, should you wish to!
Thursday, 10 September 2015
Pocket bag with contrast trim - with tutorial
This is another variation on my original pocket bag, the tutorial for which is here.
To make this bag:
Cut eight pockets to the same size. If you are unfamiliar with sewing jeans, avoid including seams around your pockets. Make sure to leave at least 1" all the way round the pocket.
Sew pairs of pockets together, side by side.
Sew each pair to another to make a 2 x 2 pocket square - each of these is one side of your bag.
Cut linings to match your bags - I find it easiest to do this now rather than working out the size before sewing. Cut a binding piece which is at least 2" wide (it can be wider if you want) and more than twice the width of one panel.
Put the two panels rights sides facing and sew round three sides, leaving the top edge open.
Repeat with the linings.
Turn the bag panels the right way out but leave the lining as it is. Put the lining inside the bag and pin at the side seams.
Pin the straps (see original tutorial for instructions on how to make these) to the front of the bag. I usually pin them half way along the width of the pockets.
Pin the binding to the top of the bag, with the right side of the binding facing the bag panels. Sew round, starting 2" after the start of the binding. After sewing about 3", pin this free piece on top of the sewn piece. Continue to the end of the binding, sewing over the original start. This will hide all raw edges.
Fold the binding inside the bag and stitch in place by hand, folding the raw edges under.
To make this bag:
Cut eight pockets to the same size. If you are unfamiliar with sewing jeans, avoid including seams around your pockets. Make sure to leave at least 1" all the way round the pocket.
Sew pairs of pockets together, side by side.
Sew each pair to another to make a 2 x 2 pocket square - each of these is one side of your bag.
Cut linings to match your bags - I find it easiest to do this now rather than working out the size before sewing. Cut a binding piece which is at least 2" wide (it can be wider if you want) and more than twice the width of one panel.
Put the two panels rights sides facing and sew round three sides, leaving the top edge open.
Repeat with the linings.
Turn the bag panels the right way out but leave the lining as it is. Put the lining inside the bag and pin at the side seams.
Pin the straps (see original tutorial for instructions on how to make these) to the front of the bag. I usually pin them half way along the width of the pockets.
Pin the binding to the top of the bag, with the right side of the binding facing the bag panels. Sew round, starting 2" after the start of the binding. After sewing about 3", pin this free piece on top of the sewn piece. Continue to the end of the binding, sewing over the original start. This will hide all raw edges.
Fold the binding inside the bag and stitch in place by hand, folding the raw edges under.
Subscribe to:
Posts (Atom)