
Friday, 27 January 2012
Today's creation - an owl bag
I've been meaning to do this for a while, but so many projects on the go! Tonight I just got so I couldn't resist it any more. I printed out all the lovely owl inspirations I have been storing on Pinterest, got out the freezer paper and went for it. A couple of hours later, this is what I have:
 It is a semi-circular bag, with a fold down flap (the head). I even took photos of the work in progress, so at some point (ie, when I have time to redraw and scan the pattern pieces) I will put up a tutorial for it. What do you think?
Wednesday, 25 January 2012
Recycled denim washbag tutorial

This is a very simple washbag made from the back pockets of two pairs of jeans.
Cut four squares, all the same size, each with a pocket in the middle. Mine were 8" square. Cut another square of denim, the same size, from another part of the jeans. From fabric of your choice, or shower curtain if you would like it to be semi-waterproof, cut five squares the same size.
Take the denim square without a pocket. Sew the bottom edge of one of the other squares to one edge of your plain square, starting and finishing 1/4" from the edge. Sew another pocket piece to the opposite edge of the plain square. Then repeat with the remaining two sides. When you open your sewing out it should look like this:

Join the side edges of two adjacent pocket pieces, starting at the plain piece and continuing to the top. Repeat with the diagonally opposite corner of the plain square.
Join two of remaining sides, but leave a gap of about half an inch in your sewing around an inch from the top. Repeat with the remaining two sides. This gap will be for your casing for the drawstring.

Repeat this process with the lining, but do not leave a gap in the side seams.
Turn the main bag right side out. Put the lining inside the bag, wrong sides together. Cut a 2" strip of fabric for the binding. Put the binding and the main bag right sides together, with the long edge of the binding at the top edge of the bag. Starting 1" from the beginning of the lining piece, sew all round the top of the bag to attach the binding to the top.

Fold the starting edge back as you reach it and sew over the top to make a closed edge for your binding. Then fold the binding over the top of your bag, fold under 1/4" and hand sew the binding to the lining of the bag. If you are using shower curtain you may wish to pin and machine top stitch instead.
Sew parallel lines at the top and bottom of the gap you have left in the side seams, all the way round the bag.

Thread piping cord from one open side seam all the way round and knot the ends. Then repeat from the opposite gap. You now have a double drawstring washbag with bonus external pockets! Enjoy!
I'm sharing this tutorial at
Tuesday, 24 January 2012

Sunday, 22 January 2012
Video about Utange
This link will take you to a video about the charity I support with my bags. Please take time to watch it, and help if you can. Thank you.
Feed 500
Feed 500
Busy sewing day!
Yesterday I managed to complete a number of UFOs. Of course, I still have even more awaiting completion, but the ones I did finish included several which people are waiting for, so I am very pleased!
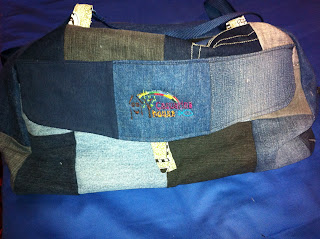 I finished three of these travel bags in denim. The pattern is based on the one in Lisa Lam's Bag Making Bible, but heavily adapted. Only special people get the Casuarina House logo on their bag, though!
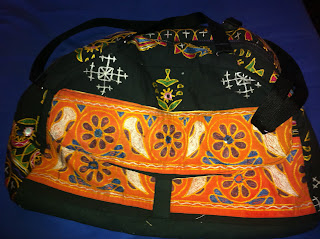 I also made this version of the pattern, for a friend, from some wonderful Indian fabric she gave me for the purpose. I'm pleased with how it turned out - but it was a bit of a stinker to make!
Finally I finished off some duffel bags. These have been in progress for some time (and I have 5 more still to complete construction!) Last week I was able to use an eyelet machine to put the eyelets in, and yesterday I added the strings and tied off the thread ends. There were seven altogether, of a mixture of these two designs.


Finally I finished off some duffel bags. These have been in progress for some time (and I have 5 more still to complete construction!) Last week I was able to use an eyelet machine to put the eyelets in, and yesterday I added the strings and tied off the thread ends. There were seven altogether, of a mixture of these two designs.


Friday, 6 January 2012
Pocket bag

This is another really easy bag to make. You will need four pairs of jeans - or, at least, the pockets from four pairs of jeans.
Cut the jeans apart by cutting up the seams. From the backs of the jeans, cut an 8" square with the pocket in the centre. Try to avoid the seams as they are very hard to sew through.
Sew the pockets in pairs, then sew the pairs together to make the front and back of the bag, using 1/4" seams. Then sew the squares together.
From one remaining leg piece, cut two 4" strips. Press the edges in by 1/4", and then press in half, wrong sides together in both cases. Sew a seam along each side of the strip as close to the edge as you can manage. These will be the straps.
Measure your bag to check the size. cut two pieces of lining to the same size as the bag and sew round three sides, leaving a gap of about 6" at the bottom for turning. Pin the straps in place between the main bag and the lining. Put the outer bag inside the lining, right sides together, and sew all round the top edge of the bag. Turn through the gap in the lining and then hand finish the lining. Press - and you have your completed bag, with plenty of pockets for shopping lists, tissues, pens, and anything else you need!
Shared at:

Tuesday, 3 January 2012
Flower bag
One of my bags. This one is very simple.


I cut 6 strips of denim 3" wide and as long as I could make them (I used adult male jeans for this one - longer leg length). I sewed these together along the long sides. The resulting piece was pressed and the short edges neatened up with a rotary cutter.
The top strips are 4" wide and 9.5" long . One of these was sewn to each short end of the stripe piece. I then folded the resulting piece in half vertically and sewed along the bottom end. At this point I measured the bag to find the size for the lining. Then the bottom of the bag was squared off; see method here (step 6).
I sewed the two lining pieces together along one short side and two long sides, then squared the base as I had for the outer piece.
Next I made the handles. Two pieces of denim 6" wide. Press in half lengthwise. Fold the edges to the centre and press again, then fold in half down the original crease and press. Stitch along both long sides.
I put the lining inside the bag, wrong sides together, pinning the handles to the outside of the bag. To cover the raw edges at the top I attached a binding 2" wide. Start sewing about 2 inches after the start of your binding piece. Stitch from the right side of the bag all the way round, sewing reinforcement over the straps (I usually reverse sew once I reach the end of the handle piece, then forwards again). When you get near to the starting point, fold your binding piece back on top of itself before continuing a bit further than your binding raw edge.
There are various tutorials online for fabric flowers. I like this one. Mine was made from a petal shape; I cut 6 out of each of two colours of fabric. For the centre I used a self cover button. I gathered the petals together, using alternate sides, then sewed them on to the button and then sewed the resulting flower onto the bag.
There you go. Flower bag. Enjoy!
Monday, 2 January 2012
My first tutorial
I have so appreciated the tutorials others have shared that I am jumping in to create one of my own. It won't be illustrated with masses of pictures, because I didn't take any as I made this! However, it is all my own work, and hopefully will appeal to someone out there.
This is a mobile phone case which I have already made in several sizes. I make items by recycling denim - see the About Me section for an explanation of why. I've made mobile phone cases before, and they sell well. I saw lots of bags, purses and cushions made by others using owls, and thought it would be a good design for a phone case as well. These were quick to make - I made them in batches of 6 at a time.

I put the main fabric and the lining fabric right sides together and joined them along the short edge, but with the pieces for the front of the phone case I put a loop of cord elastic between the two pieces. Sew carefully over this - my machine didn't appreciate the jump in thickness! Open out both pieces and iron flat.
Put the two pieces of fabric right sides together, with the main fabric pieces together and the lining pieces together. Start at the long end of one of the lining pieces and sew all the way round one long side (both fabrics), the short side of the main fabric and the other long side.
Use the open short side of the lining to turn your phone case the right way in. Then either hand stitch the short side of the lining together (if you want a perfect finish) or sew it on the machine (if, like me, you are short of time and realise it will not be seen unless someone decides to turn it out!) Put the lining inside the main case, press again to make sure the top seams are flat, and voila, you have finished. Enjoy!
To make a case for a slightly smaller phone I used rectangles 3.5" x 5" and kept the wing, beak and eye pieces the same sizes.
This is a mobile phone case which I have already made in several sizes. I make items by recycling denim - see the About Me section for an explanation of why. I've made mobile phone cases before, and they sell well. I saw lots of bags, purses and cushions made by others using owls, and thought it would be a good design for a phone case as well. These were quick to make - I made them in batches of 6 at a time.

I started by cutting two rectangles of the base fabric (denim), each 4" x 6". This will fit an iphone or similar smart phone. I cut rectangles of the linking fabric to the same size. Also from the lining fabric I cut the owl wings. Now, I don't have a pattern for this, but they are rectangles of 3" x 1 1/4", with the top rounded off. The circles for the eyes were made by tracing round the edge of a Gutermann size cotton reel. The triangle for the beak I drew freehand - just make sure it is isoceles (two sides the same length and two angles the same).
I first appliqued the wings, eyes and beak onto the backing fabric. I didn't bother with using iron on webbing for this; I just went slowly. Then I sewed on the buttons for the eyes and a button half an inch down on the centre back main fabric for an elastic loop (to make sure your phone doesn't fall out!) I put the main fabric and the lining fabric right sides together and joined them along the short edge, but with the pieces for the front of the phone case I put a loop of cord elastic between the two pieces. Sew carefully over this - my machine didn't appreciate the jump in thickness! Open out both pieces and iron flat.
Put the two pieces of fabric right sides together, with the main fabric pieces together and the lining pieces together. Start at the long end of one of the lining pieces and sew all the way round one long side (both fabrics), the short side of the main fabric and the other long side.
Use the open short side of the lining to turn your phone case the right way in. Then either hand stitch the short side of the lining together (if you want a perfect finish) or sew it on the machine (if, like me, you are short of time and realise it will not be seen unless someone decides to turn it out!) Put the lining inside the main case, press again to make sure the top seams are flat, and voila, you have finished. Enjoy!
To make a case for a slightly smaller phone I used rectangles 3.5" x 5" and kept the wing, beak and eye pieces the same sizes.
Hope this makes sense; next time I will try to take more photos as I go along.
Subscribe to:
Posts (Atom)